I had finally had enough of my boys’ bathroom. Though it may have had a few updates over the years, it has basically stayed the same since the house was built in 1986. Finally, with some time on my hands, I decided it was time to make a change. A Long
List of Needed Bathroom Updates
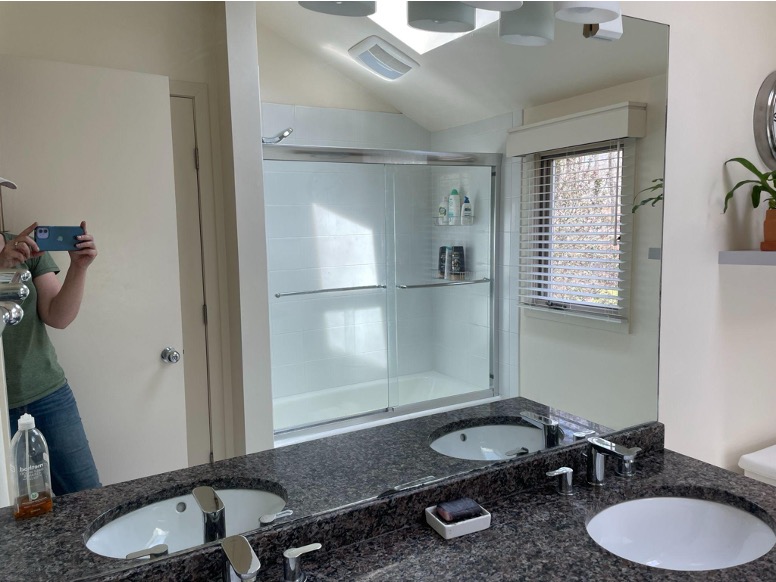
The list of what needed to be updated is long. The bathtub had to be replaced or at least reglazed. The white tile and grout were beyond dingy and needed to go. Besides being in the early stage of deterioration, the big 1980s frameless mirror had to go. The toilet needed to be changed out for one that uses less water. The shower head needed to be raised to fit my no longer little boys’ height. I was already fantasizing about new shower doors; the current ones weren’t so transparent anymore. Plus, a shower niche for shampoo and soap would address the precarious set-up of placing bottles on the tub’s edges.
An Intergenerational Challenge
Excited, I went to bathroom showrooms, looked at new tubs, got tile samples, and called a few contractors for quotes. In my enthusiasm, I told my oldest son, Pete, how he’d hopefully have a new bathroom when he was home for summer break. His reply: “Aren’t you Ms. Environment? So, you’ll put stuff in the landfill when it’s perfectly fine?” I told him it wasn’t OK, and somehow this was different, and tried to argue my side, but he just replied, “Practice what you preach, Mom.”
Well, Pete had thrown down the gauntlet, and now it was game on. I searched the internet for ideas and made a plan.
The Tub
The first thing I did was tackle the tub. I thought there was no way it could be saved. I wish I had taken pictures of the ‘before’ because it was rust-stained and looking nasty; I could not save it.” I went to Weed & Duryea and picked up a large container of CLR (Calcium, Lime, and Rust remover). Though it is an EPA “Safer Choice” product, I made sure to open windows and gloves while cleaning. I cleaned that tub for four hours non-stop, and it looked brand new after literal hours of elbow grease. I was utterly shocked! It didn’t need to be replaced or reglazed; it just needed a lot of scrubbing.
The Shower Doors
I had thought that even if I saved the tub, I’d still have to replace the sliding glass shower doors. The problem was that the doors were screwed into the tiles, and if I removed them, I would have to unscrew them from the tiles – which would probably damage the tile. I decided to try to tackle the shower doors with CLR as well. It was a miracle worker! I once again did a lot (A LOT!) of scrubbing. All the limescale and soap scum eventually came off, and the glass doors were transparent again. I used Q-tips and a toothbrush to clean between the tracks. In the end, it was completely worth all the effort.
On to The Mirror
Next, I focused on the mirror. How can you keep a mirror that has started to de-silver? I looked online and came across a company called MirrorMate. According to the website, I can frame my mirror myself and save money. I ordered a few samples that came quickly in the mail. After making my frame style choice, I followed the detailed measuring instructions, and in less than two weeks, I had a frame – well, pieces of a frame.
Using glue and wood pegs that came in the package, I – or should I say, we (my husband did most of it as he doesn’t trust my patience in these matters) put the frame together and waited for the glue to dry. Then, following the instructions, I cleaned the mirror with provided alcohol wipes so the adhesive strips on the back of the frame pieces would adhere adequately to the mirror. I was such a massive fan of the results I ordered a frame for our downstairs bathroom.
Grout & Caulking
The next problem was the grout and the caulking: it was gross. I wasn’t sure how to fix it; bits of grout were missing between some tiles in the shower. YouTube to the rescue. I watched videos on how to regrout and caulk the bathroom. Making a grout paste wasn’t so tricky, and I could make the repairs between tiles.
However, this presented a couple of things that could be improved. The new grout didn’t match the old grout color, and what I didn’t patch up didn’t look so great. So, this time, I headed to Home Depot and purchased Polyblend Grout Renew. According to the Home Depot website description:
“Polyblend® Grout Renew is a waterborne acrylic stain and sealer for renewing or changing the color of cement grout joints. Formulated with fade-resistant pigments, Grout Renew seals the grout against stains while it colors.”
I had used this product on my kitchen grout and was happy with the results, and I was just as pleased in this bathroom. I used a toothbrush to “paint on the grout” as directed. I used it in both the shower and on the grout on the bathroom floor. I did get a fair amount on the tiles, but I waited until the next day, after the grout sealer was dry, and then used a scrubbing sponge (Scotch Brite – Dobie sponge) to go over the tiles. The Grout Renew cleaned off the tiles pretty quickly but stayed in place on the grout. According to the description, the Grout Renew should last two to three years with regular cleaning.
Don’t Forget the Shower Head
The shower head in the bathroom was going to be a problem. I had initially wanted to rip out the walls to raise it, but that was no longer possible. I also wanted a second hose so the shower could be adequately cleaned.
I looked online for possible solutions and found The Moen Brecklyn 82611 showerhead. It rose higher from where it was attached, about three inches taller than our previous shower head. It also has a second hose attached by a magnet to the main shower head. In my excitement, I didn’t just buy the shower head, which was possible and about $200 cheaper; I purchased the whole package with a new faucet and handle and drain to match. The problem was when our plumber, Scott Ready, came to install he could only install the shower head. Switching out shower heads is not a problem, but installing new faucets and drains means tearing out tiles and replacing the entire system behind the scenes.
I realized at this point that I should have asked Scott first before purchasing anything, but he told me to keep everything in case I have a problem in the future. He was trying to make me feel better about my mistake. Realizing I was unhappy about keeping the considerable glass knob faucet control, he found a replacement in his van, which was far more updated and usable with my current set-up. It’s not perfect, but it’s pretty close.
The Shower Niche?
Next, I needed somewhere to store all the soap and shampoo in the shower. When left on the corners of the tub, the bottles would fall and make a mess. I thought about one of those bottle holders that hang off the shower head, but I’ve never had good experiences with them. With the new shower head, that was even possible.
Luckily, my sister had the same problem in her kids’ bathroom and directed me to the Orimade Shower Caddy Basket Shelf Storage Rack on Amazon. On her recommendation, we bought a pair; honestly, I did not have high expectations. First, the directions called for the area where the adhesives were to be stuck to be thoroughly cleaned with alcohol and allowed to dry. Then, once the adhesives were placed, they must be kept dry and undisturbed for 24 hours. To ensure these rules were followed, I had nothing to do with putting up the adhesives, and I was barred from the bathroom for 24 hours – not even allowed to check on them. Though not the niche I wanted, the caddies have held up well and look much sleeker than other solutions. Also, it is a really good price at about $20 for the pair.
Decoration Time
Now that the major items were finished, it was time to decorate. I removed the old metal blinds and purchased new wooden blinds through Blinds to Go. Putting in the blind measurements online, my blinds were ready within two weeks, and I picked them up from their Norwalk store. There was no way to save the old blinds as they were bent out of shape.
The toilet was staying. Because our kids are in college, and as a result, the bathroom wasn’t getting too much use, we would put an improved toilet on hold. I figured we would figure out a system to save water in the future. Instead, I focused on the area above the toilet. I decided to put up a shelf and repurpose the clock in the bathroom by changing its location to face the shower.
I wanted to add some plants to the bathroom ( I love houseplants) and picked up some easy-to-maintain plants from Lowe’s. As for what else to put on the shelf, I searched the internet for ideas. I decided to grab some glass jars from the Swap Shop and fill them with cotton balls, cotton pads, and Q-tips. I realize that, in theory, these items may be used (not to worry, no Q-tips in the ears, my kids know that), but it’s doubtful; it’s mostly just for display. As a joke, I grabbed an “I Can’t Adult” sign from the Swap Shop, as most of the pictures I saw online had a small sign. I swear it was a joke, but my kids don’t mind it, and somehow it remains.
Last Step: Painting and Artwork
The bathroom counter, sinks, and faucets were perfectly fine – I really like them, so there were no changes there. The cabinet was in great shape as well. So, besides some painting to brighten up the place, there was just one more item – some artwork. My kids weren’t so keen on pictures of them when they were four and six on the bathroom walls, so I found a canvas print in Bar Harbor that would suit both. Now, a canvas print in a bathroom may have been a bold choice – or stupid, it does get humid in a bathroom – but I had to buy it. Both my guys have hiked the Beehive trail and love Acadia, so it was perfect for their bathroom. If you are interested in it, you can find one in every store in Bar Harbor.
All in all, I’m happy my son called me out. I’m so pleased with the results that I spent $824 on my DIY remodeling job when all the receipts were counted. This includes the frame, the grout, the grout color sealer, cleaning products, the shower head, the shower caddy, the shelf, plants, and the canvas print. Also, I must admit I have a real pride in doing it myself.
Now, I’m looking at other projects in my home in a different light and realizing that not everything has to be new. It just may need to be freshened up.
Want to get some more ideas of about how you can reduce waste in your household? Check out the waste reduction ideas here: Food scrap recycling; Recycling; Seasonal recycling programs; and the Swap shop.